I’ve had a little bit of a splurge on a few new patterns because a couple of pattern companies have had release sales lately! It means I’ve done another batch cut and sew to create another little capsule wardrobe for Lottie and matching t-shirts for Toby too.
The whole outfit was inspired by these two banana prints that I bought a while ago in a sale at Fabric Godmother. Toby loves bananas, and it’s one the words that he uses often so he was very pleased to see this print.
Toby’s t-shirts are Brindille and Twig ringer tees. I’ve made him the next size up- 18-24 months. It’s a staple that I keep going back to! The fit is quite roomy which is useful when you know that. Toby is a chunky 22 months and still has plenty of growing room.
I made Lottie ringer tees to match, but with my snap neck hack. To go with them I’ve been testing out new patterns. First up is the Made By Jacks Mum pick n’mix bodysuit.
The pick n’mix has loads of options, including a t-shirt cut line and both ‘regular’ and ‘cloth bottom’ fit bodysuits. I’ve gone for the cloth fit, and the snap neckline. There is also an envelope or crew neck option.
I’ve always liked the idea of making bodysuits to go with handmade baby outfits, but I find it hard to justify spending time making something so basic and that can be bought so cheaply. This was a slightly fiddly make. I’m not 100% happy with the binding so I am wondering about doing it as a band in future instead.
On these bodysuits the side seam is sewn after the binding, so I’ve stitched the side seam allowance down with a few little stitches. It’s quite a common feature of shop bought bodysuits too.
The little offcuts from were great for creating a couple of little appliqués. I used bondaweb to fix them in place, and a fusible wash away stabiliser to stop anything from stretching as I sewed. This has been through the wash a couple of times and the stabiliser still hasn’t washed out completely, but it did make the sewing really easy.
I’m looking forward to showing you the next parts of this mini capsule. I have 3 more new to me patterns to share, some of which are about to become firm favourites!
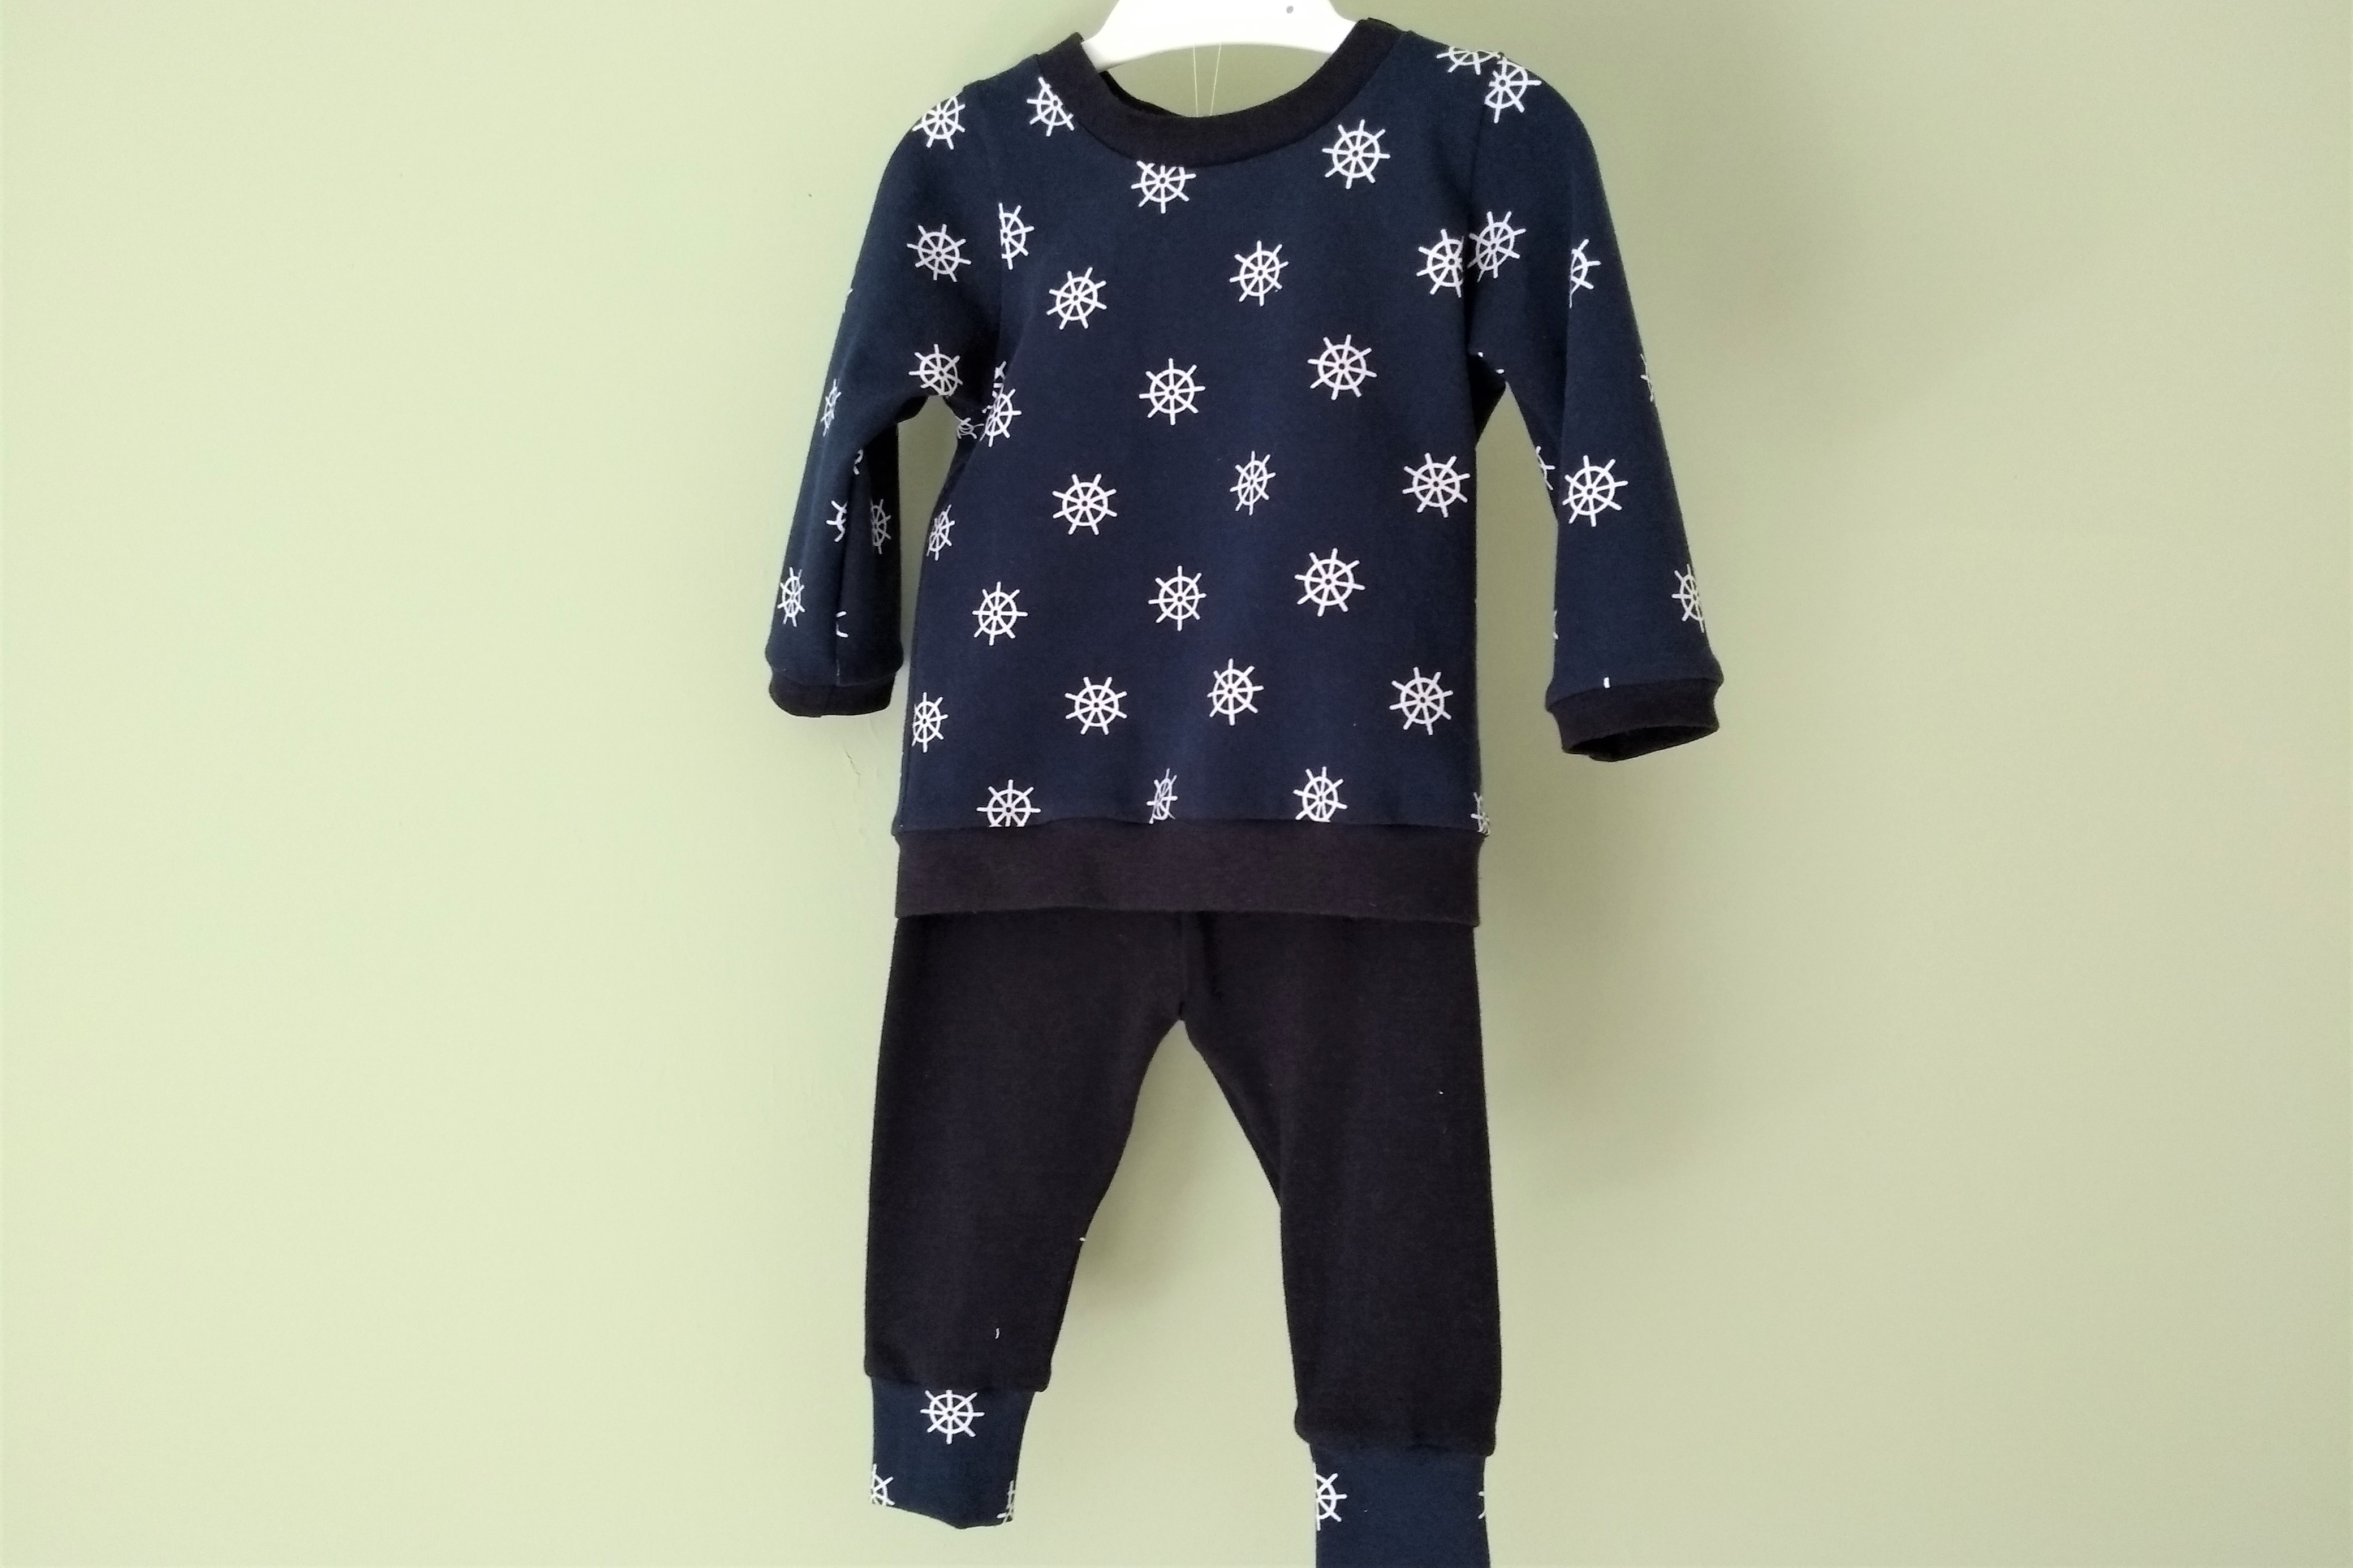
This post comes a bit out of sequence because it is another collaboration blog post going live on Minerva Crafts this week. They kindly gifted me the fabric, in exchange for a blog post and photos. I was able to use this very sweet cotton spandex print to make a ‘coming home’ outfit for the new baby, and a co-ordinating t-shirt for Toby, so these were actually sewn in about May or June last year!
One of the reasons that I chose this fabric to test was because it would co-ordinate really nicely with the other pieces that I have already made and blogged in grey and green. It seems like a good idea for the baby to have a wardrobe that will mix and match as well as possible, so these are also in the newborn size.
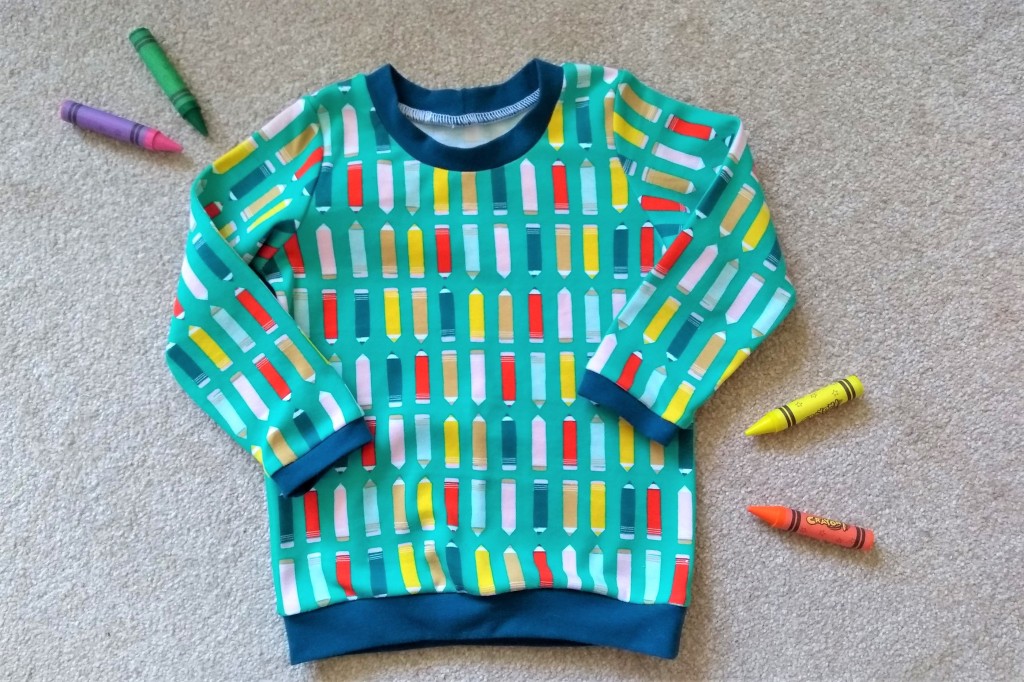
I used the same patterns as the ‘pencils’ outfits, and this was actually finished first, inspiring a search through my stash to find some other fabric options. Toby’s t-shirt is a Brindille and Twig Ringer Tee, so also a free pattern. This time I left off my neckline hack and just made it as in the pattern. It is so quick to sew up, and I think this is the 12-18 month size.
As always, the full blog post can be found on their website here, with more details and pictures. Enjoy!
When I made the co-ordinating clothing set for baby it inspired me to have a look for some other fabrics in my stash to make some alternatives! I thought it would be nice for Toby to join in too and be able to co-ordinate with baby for some ‘coming home’ pictures. We often dress Toby in a long sleeve t-shirt rather than a jumper anyway so I thought it would be nice for him to have a couple more for the autumn and winter.
I bought half a metre of this ‘art class’ jersey in green from Ray Stitch in the sale ages ago thinking that it would be nice to use for Toby at some point. Baby things are such a good way to use a small remnant or cut of a more exciting print in combination with other solids so I paired this with some cotton spandex in peacock blue from Girl Charlee.
For Toby I’ve used the Brindille and Twig Ringer Tee again as a great basic tee. I had enough of the pencils jersey to cut out a pair of t-shirts which are the reverse of each other. Both look really great, so I’m looking forward to Toby growing into them.
Once they were finished, there were still a few scraps of jersey left and it seemed a shame to put them away or to waste them. I managed to use all the little left over pieces to make another newborn baby set. This time I used the cuffed version of the wee lap tee to more closely mirror Toby’s top, though there was only enough of the printed jersey to cut the front so the back is plain.
I got to use the final option from the Teeny Beanie pattern too- the plain hat without ears. Now I’ve made all three types and like them all. This one is the fastest and least fussy to construct I think though.
Even the tiniest scraps got used to tie in the feet of the footed trousers. This is a slightly more understated outfit for the baby I think. Still definitely a ‘set’, but I’m sure we will mix and match the pieces with other clothes too.
I’m really hopeful that we will be able to get some great family photos once the baby arrives in their matching outfits, but even if they don’t ever get worn at the same time, I know that both Toby and the baby will get some good wear out of these this winter. Now I just need to trace off the next size up to be ready for the next growth spurt!
Last year I found it really helpful to think about which of my makes hit the mark, and which were less successful with my hits and misses, so I thought I would have another go this year too. I think most of my sewing has been fairly successful this year, though I have just done a wardrobe clear out, and a few handmade clothes did get the axe, so its certainly not perfect yet.
So here we go:
Top 5 Hits
Amber tops and Dress
I practically lived in my Amber tops during the last part of my pregnancy when it was hot and my bump was huge. Even since then, I must wear one at least 2-3 times a week because they are one of my most practical options for feeding in too. I particularly love my Amber dress because I think it looks fairly stylish and is so easy to just throw on, and my Amber hack layering tee also gets a lot of wear under shirts at the moment. I think the reason they have been so successful is because they suit my lifestyle as it is right now, not how I might wish it was. They are also made in good quality cotton jersey, so they have survived lots of washing and grabbing straight back out of the laundry pile!
Oslo Cardigan
This is another item of clothing that regularly gets taken straight from the clean washing pile to be put back on. When I first made it I wasn’t sure about the style on me and this was really intended as a wearable toile. However, the oversized nature of it has definitely been growing on me, and I love how easy it is to throw on. I would love to make another (possibly multiples) as again it fits my lifestyle right now really well.
Modified Toaster Sweater
I made this Toaster sweater right at the start of the year with some very special Atelier Brunette fabric. I’m pleased that I used this very special fabric in something which is comfortable and practical. I love that it fits over my Archer shirts, and the crew neck is more practical with a collar. I’m even really pleased with my decision to go for contrasting gold topstitching.
Ultimate Wrap Dress
This dress is another make that I love because I tweaked the pattern to create what I actually wanted. I hacked the sleeve into a little flutter sleeve, modified the cross-over to be a little higher and added an empire line seam to make it fit over the bump. I have worn it a bit since the arrival of baby too, though I think it might now need re-hemming to take out some of the extra length that I added to the front. I’m looking forward to being able to wear it again next summer.
Ringer Tee
I have made a mountain of these tops for Toby and as gifts, and I’m sure there will be more. I particularly like hacking them to have poppers at the neckline while he is small, but the pattern goes up to ages 5-6, so I’m sure I will make more as he grows. It’s a free pattern too, so what’s not to love!
Hits Conclusion
There were a couple of other patterns that I would have included, but I thought it might be cheating to include patterns that made it onto last year’s successes like the Mens Metro Tee and Grainline Archer because I knew before I got started that I would love them! I also thought that perhaps I couldn’t include the skirt that I am currently sewing, even though I’m pretty sure it will be a hit because I haven’t actually worn it yet! Another that came close was the Dandelion Dungarees because they have seen a lot of wear in the last few months and the popper hack definitely worked there too. I think the things that I have included demonstrate that I’m getting more confident at hacking patterns to get what I actually want from them, not just putting up with the parts that don’t work for me.
Top 5 Misses
Kinder Cardigan
Considering how much I love my Oslo cardigan, it seems a little strange that I’m not such a big fan of the Kinder Cardigan which is pretty similar. I think it is down to a couple of issues, one being that the pattern is possibly even a little more oversized than Oslo. The other being that the Ponte I made it in is definitely more structured so it ‘feels’ bigger. I did like some of the construction methods, and the pockets though, so I’m tempted to adopt some of these for my next Oslo cardigan attempt.
Blossom Dress
Technically this was made in 2017, but I was never really going to wear it until this year. I’m not sure if it is just because it is such a large expanse of single colour, but I didn’t really hit it off with this Blossom dress. I love the fabric, and the Anna Top that I squeezed out of the offcuts, but the dress hardly got worn. It probably doesn’t help that it looked a bit strange before I had a big enough bump, and by the time my bump was bigger the weather was warming up. This hasn’t survived a recent wardrobe clear out because it looks ridiculous again without a baby bump. Perhaps it would have been better as a top.
Lucia Top
A more recent make was this Lucia Top. It was a great way to kickstart sewing again being really simple, but I’m not a massive fan of the fabric. It’s a bit too shiny and ‘polyester’y. It has survive the wardrobe clear out, but only to see if I will wear it during the festive season when red and shiny seems more acceptable. If it doesn’t get worn it might have to go too.
Lily Top
There is nothing actually ‘wrong’ with this Lily Top, it just doesn’t get worn as often as I thought it might. I did wear it while I was pregnant, and I do sometimes wear it now to feed, but I wasn’t 100% pleased with the finishing techniques and there are some areas that I don’t think are going to be all that robust. It’s not a total fail, though I don’t think I would make the pattern again.
Miette Skirt
Again, there is nothing ‘wrong’ with this skirt, but I think it suffers from not suiting my changing body and style. I have been wearing a lot less that sits actually at my waist because I don’t find it that flattering at the moment. Perhaps that will change in the future and I will feel better wearing this skirt though. With hindsight, though the pockets are really useful, they just draw more attention to an area that I feel less confident in at the moment!
Misses Conclusion
I think several of these projects have suffered from the difficulties of guessing what sorts of things I was going to want to wear as my lifestyle and body have changed. Hopefully now that thigs are starting to settle down I can make more informed choices for next year and get more of them right!
The basic T-Shirt is so speedy to sew. I made a tiny t-shirt to coordinate with Matt’s space Metro Tee.
And a couple of long sleeve versions using my popper neckline hack. A few months in to dressing a baby and I definitely gravitate to the easiest option when getting him dressed!
To coordinate I made two pairs of leggings to mix and match. The orange ones look a bit 80’s but I think they are a fun change from the mostly blue trousers we seem to have!
To finish off I even have a first modelling appearance from Toby. It’s surprising hard to get good photos of a baby modelling clothes.
While I was waiting for baby Toby to arrive, I was making good use of the time to sew up some more tiny outfits from all my jersey scraps. A couple of friends have also been expecting little ones, so it seemed like a nice idea to make a little outfit for each of the new arrivals.
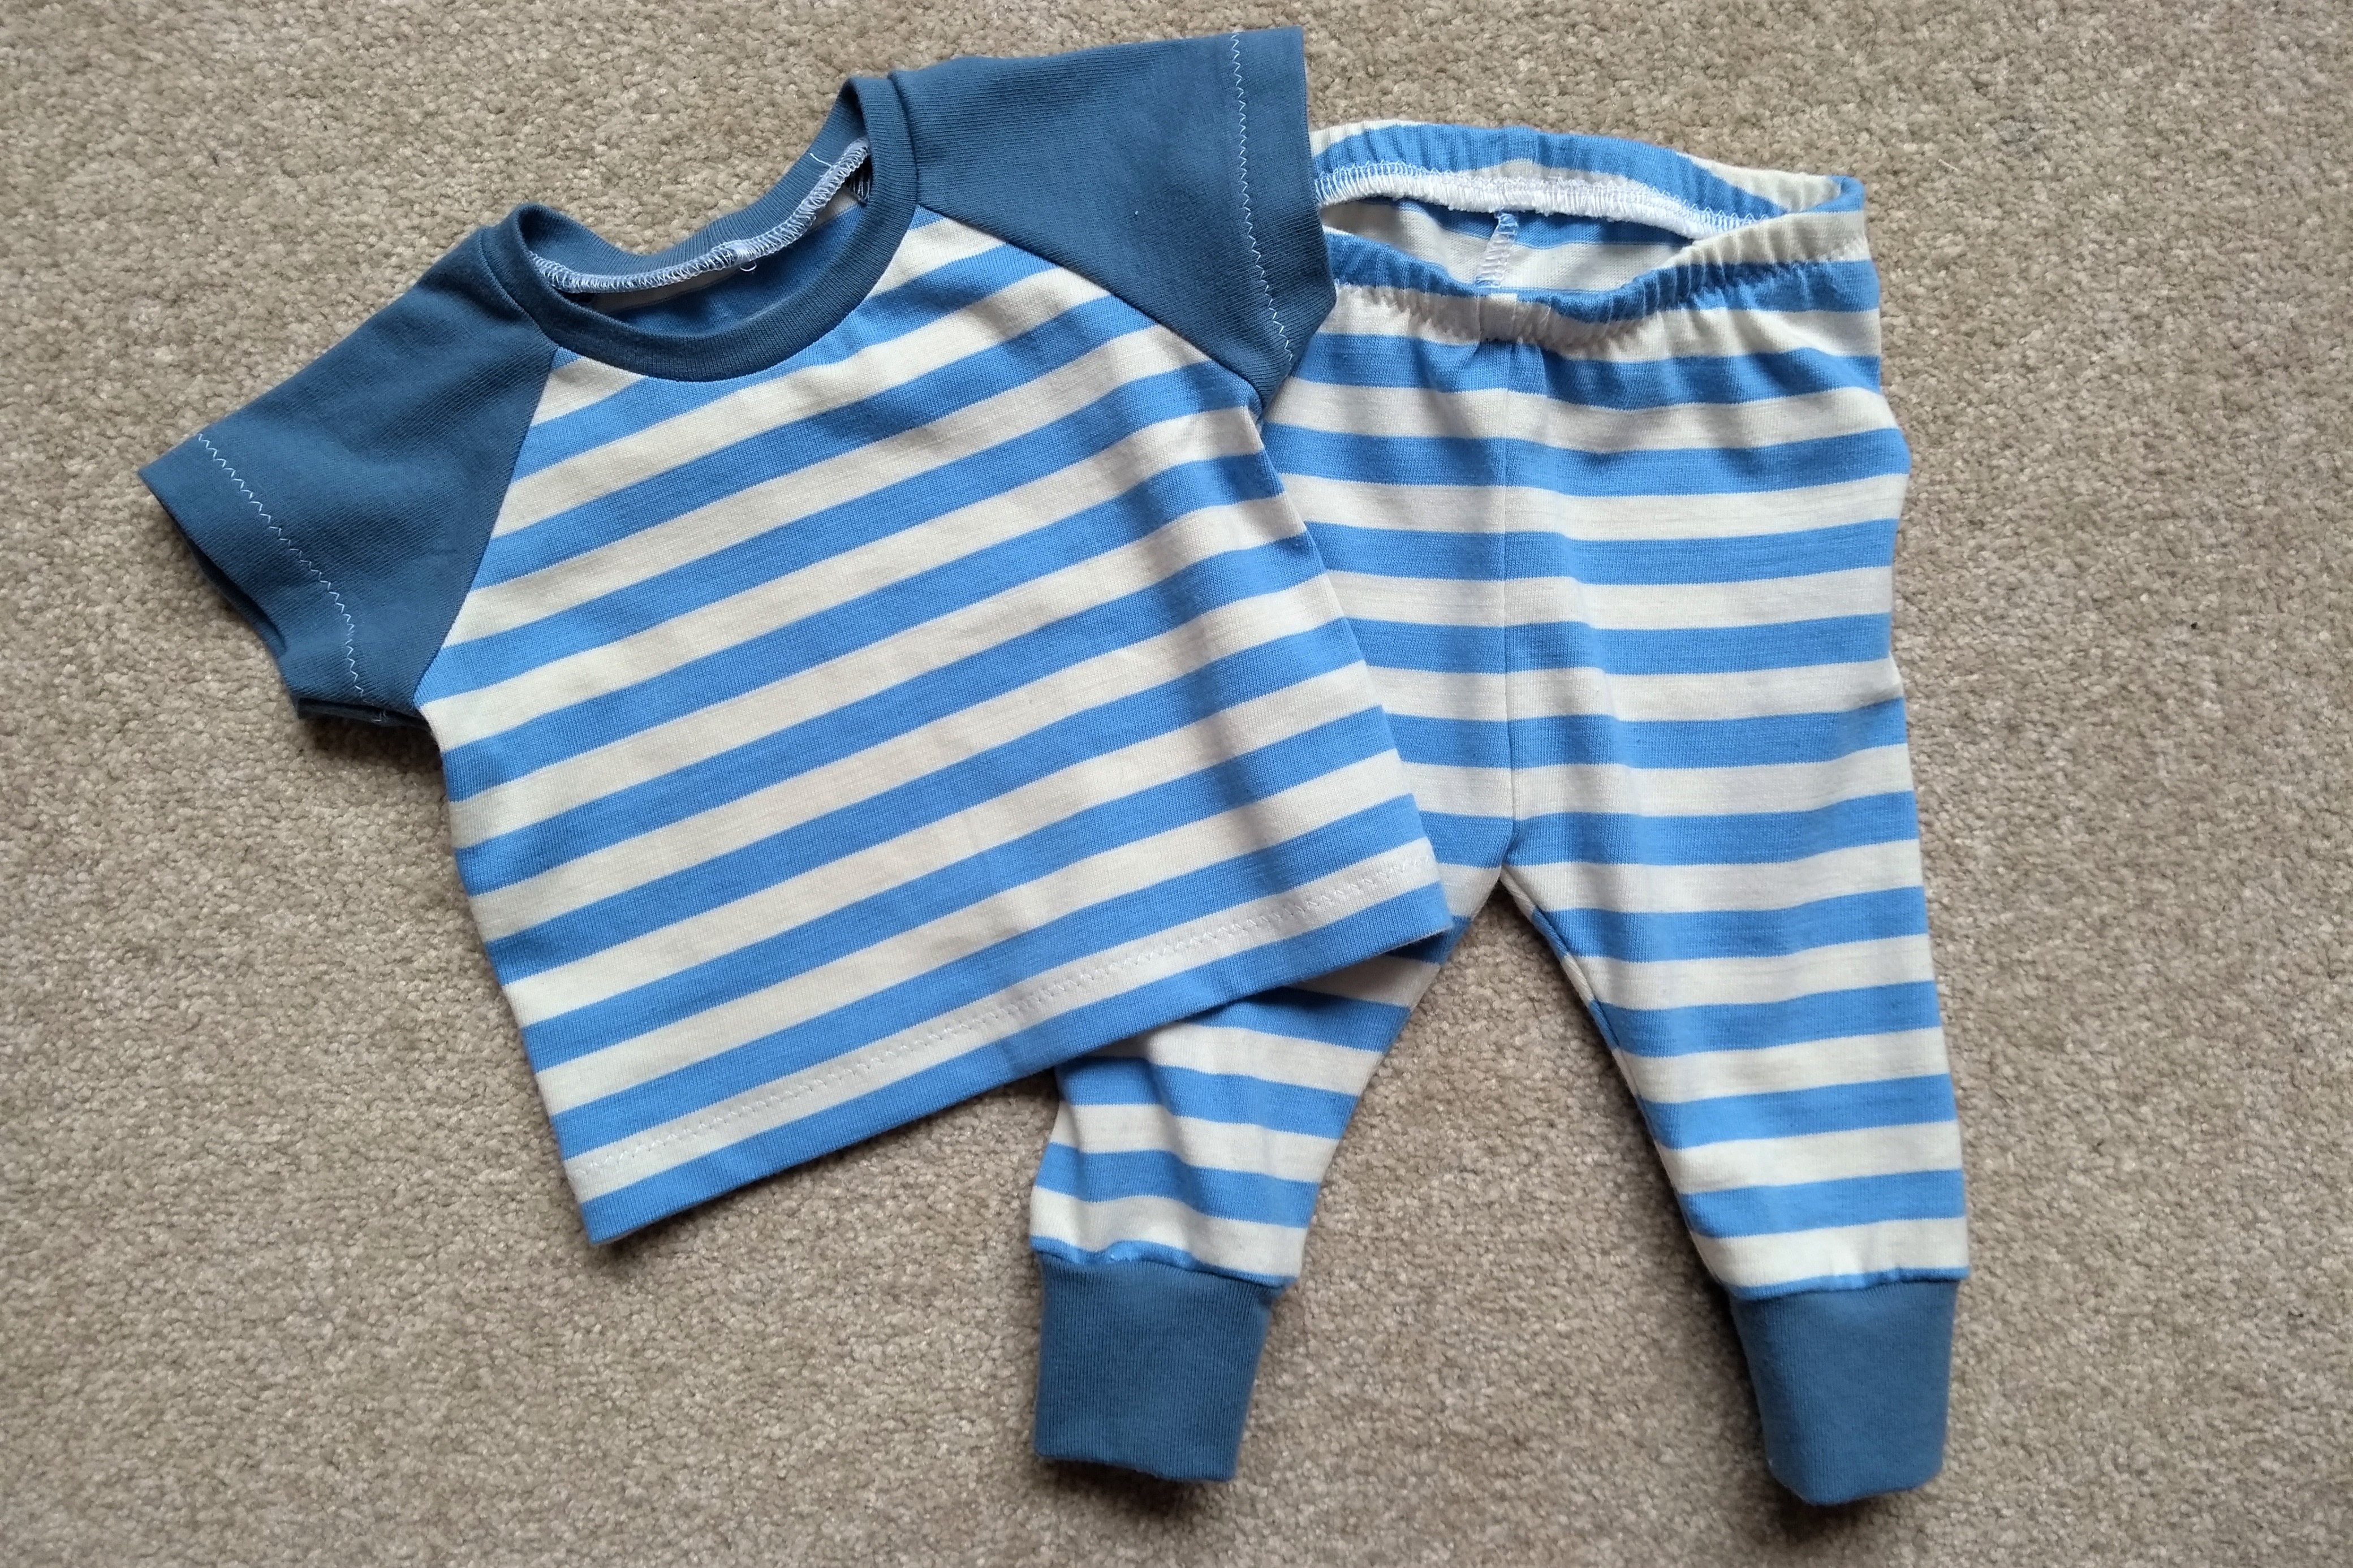
Because it is near impossible to guess how big or how fast the babies will grow, I went for the 3-6 month sizes this time, and decided to pair the Brindle and Twig cuff leggings with my hack of the Ringer Tee to have a popper neckline.
The resulting outfits look very smart, and have been happily received their new owners.
I even remembered to sew a tag into the leggings to help tell the front from the back!
Because babies cannot be relied upon to keep clean for long, I thought that a couple of dribble bibs in co-ordinating colours would make a good addition to the outfits. These are just triangles of bright quilting cotton, backed with some soft sweat-shirting. I used Prym colour snaps as closures because they come in so many fun colours and designs.
The other bib is just a simple outline, again with snaps to close it. I did a bit of scrap quilting in pretty coordinating fabrics.
I love putting together baby clothes. Its just such a good use of scraps and special fabrics!
A couple of weeks ago I posted about my hack to the Brindle and TwigRinger Tee pattern to give it a popper opening/closure and make it easier to get on and off. I thought that I would put together a proper tutorial. This method will work for any t-shirt pattern with a shoulder seam, and doesn’t have to be limited to just children’s clothing. You could just as easily use the same method to add a fun feature to an adult jumper too. I’m using the Ringer Tee pattern pieces again simply because it is a readily available and free pattern so any of you that want to give this a go, can!
Pattern modifications
Step 1:
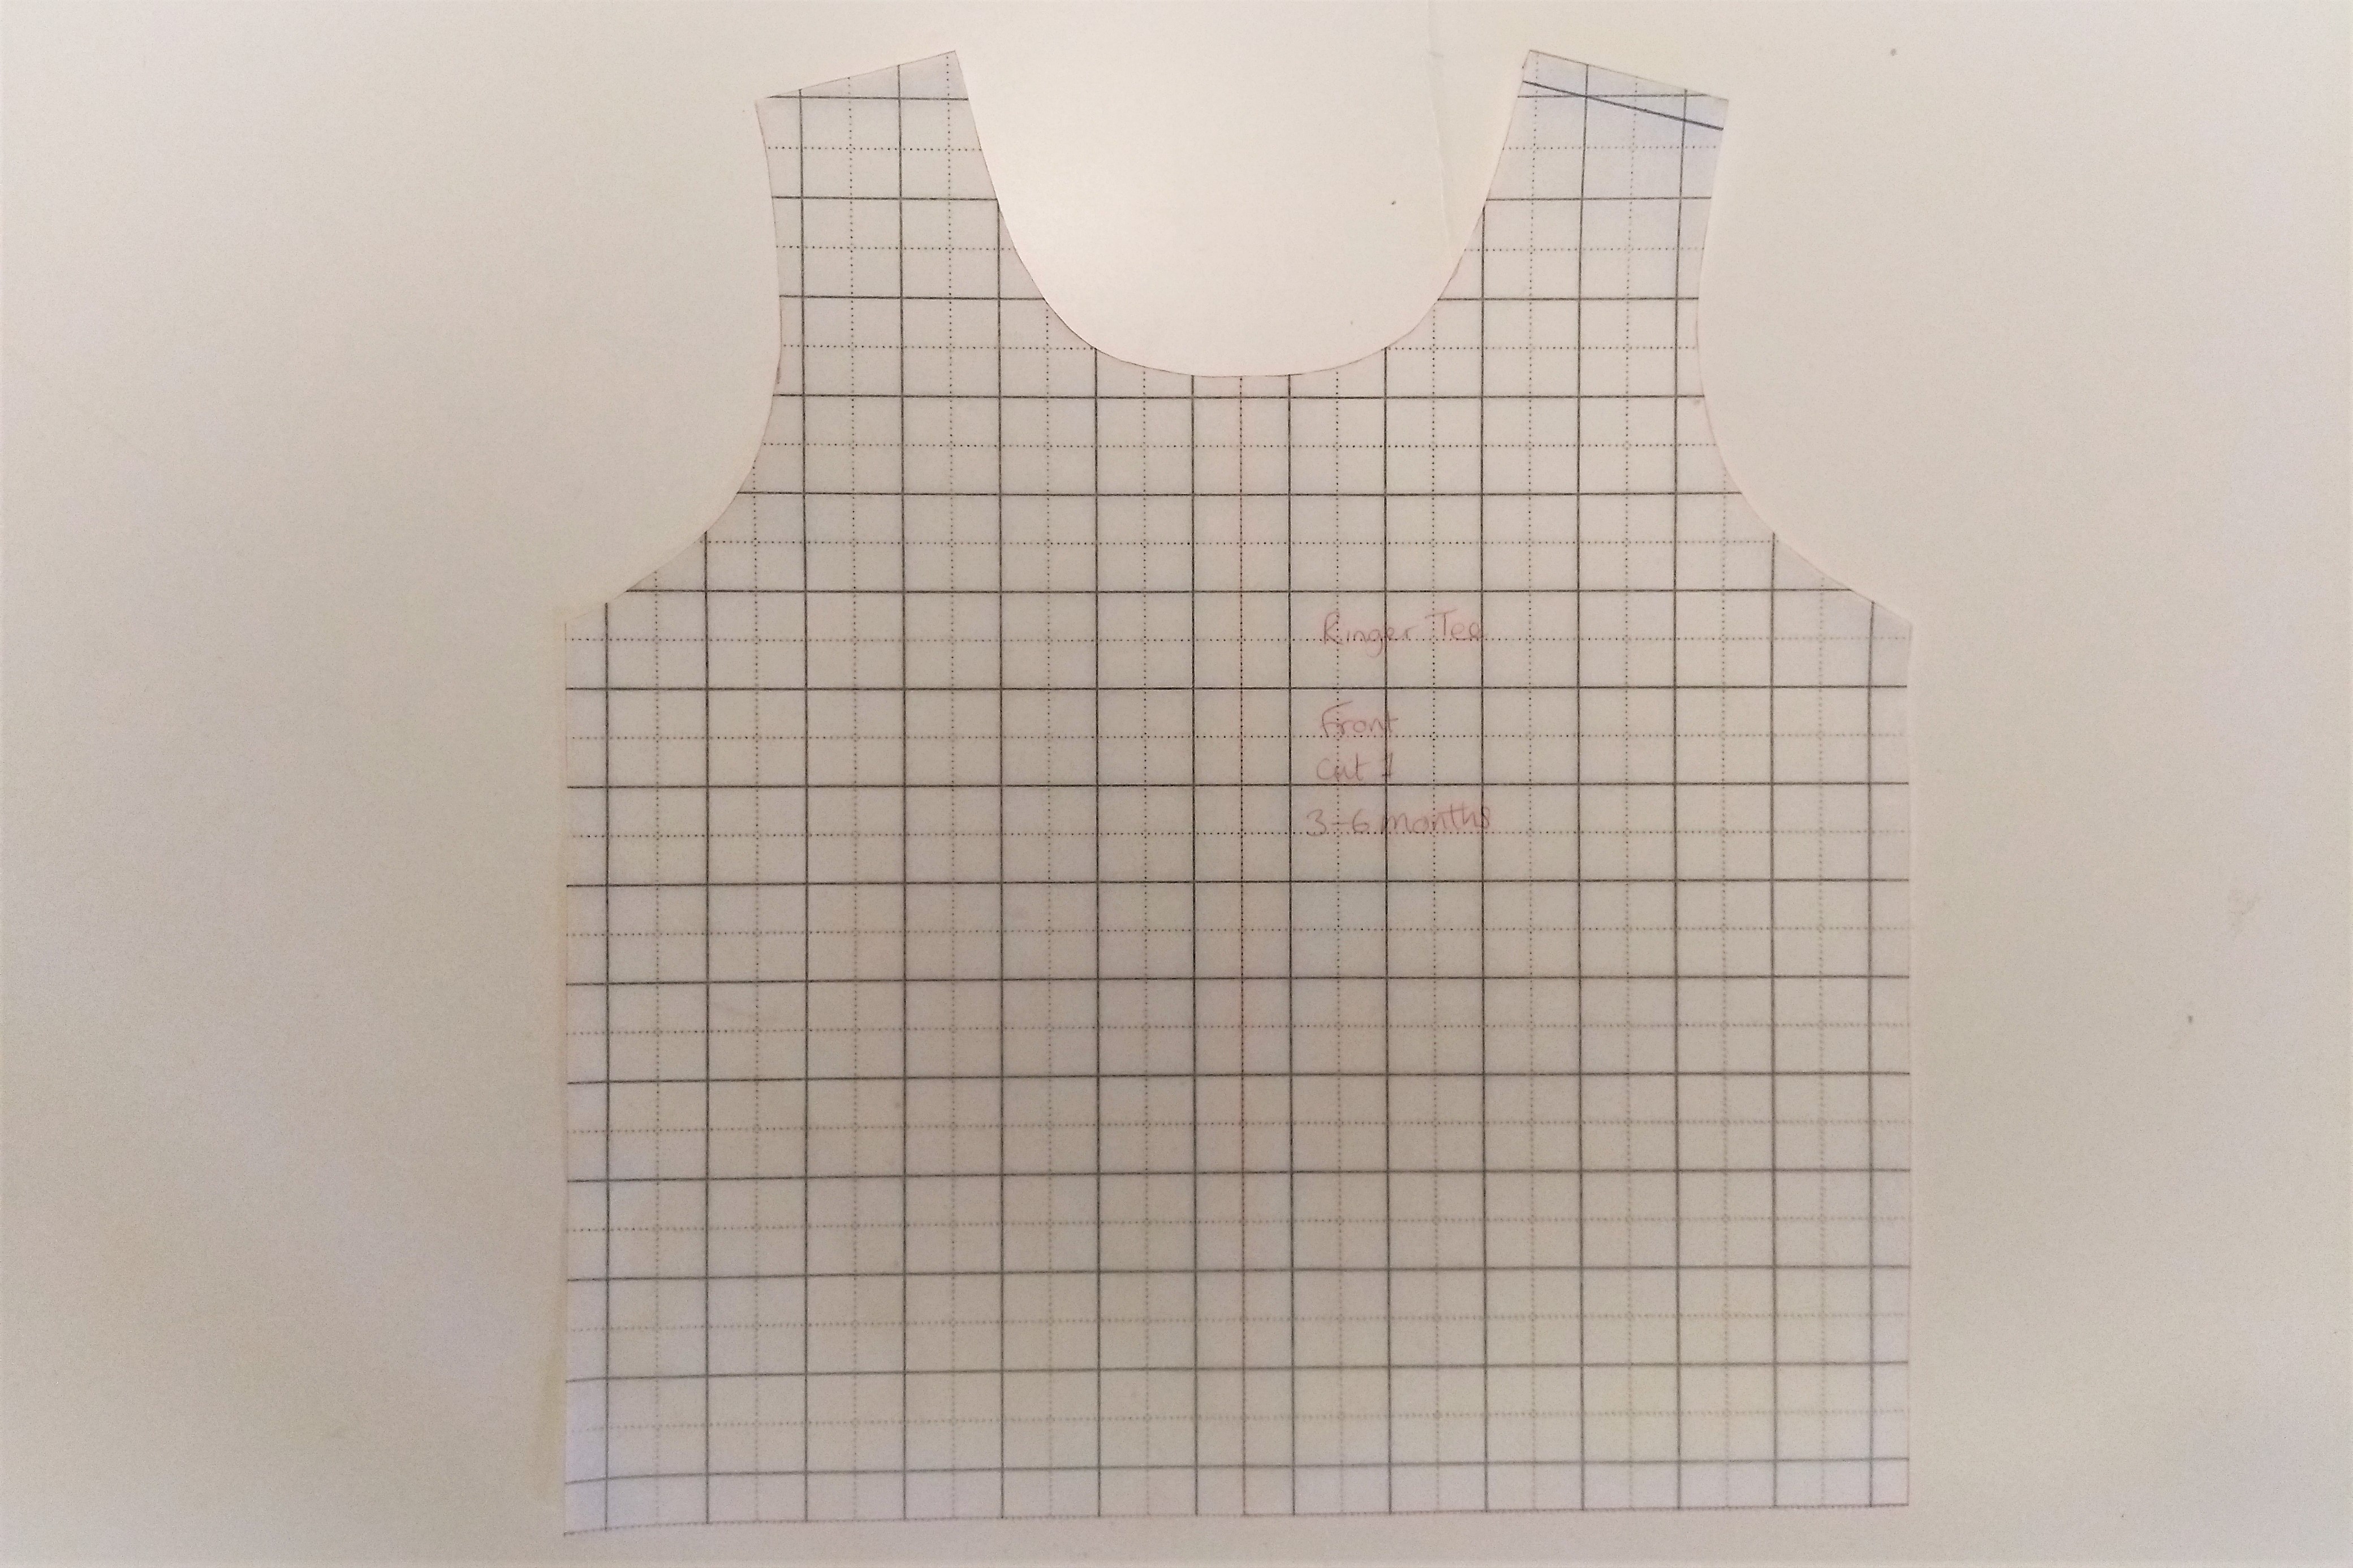
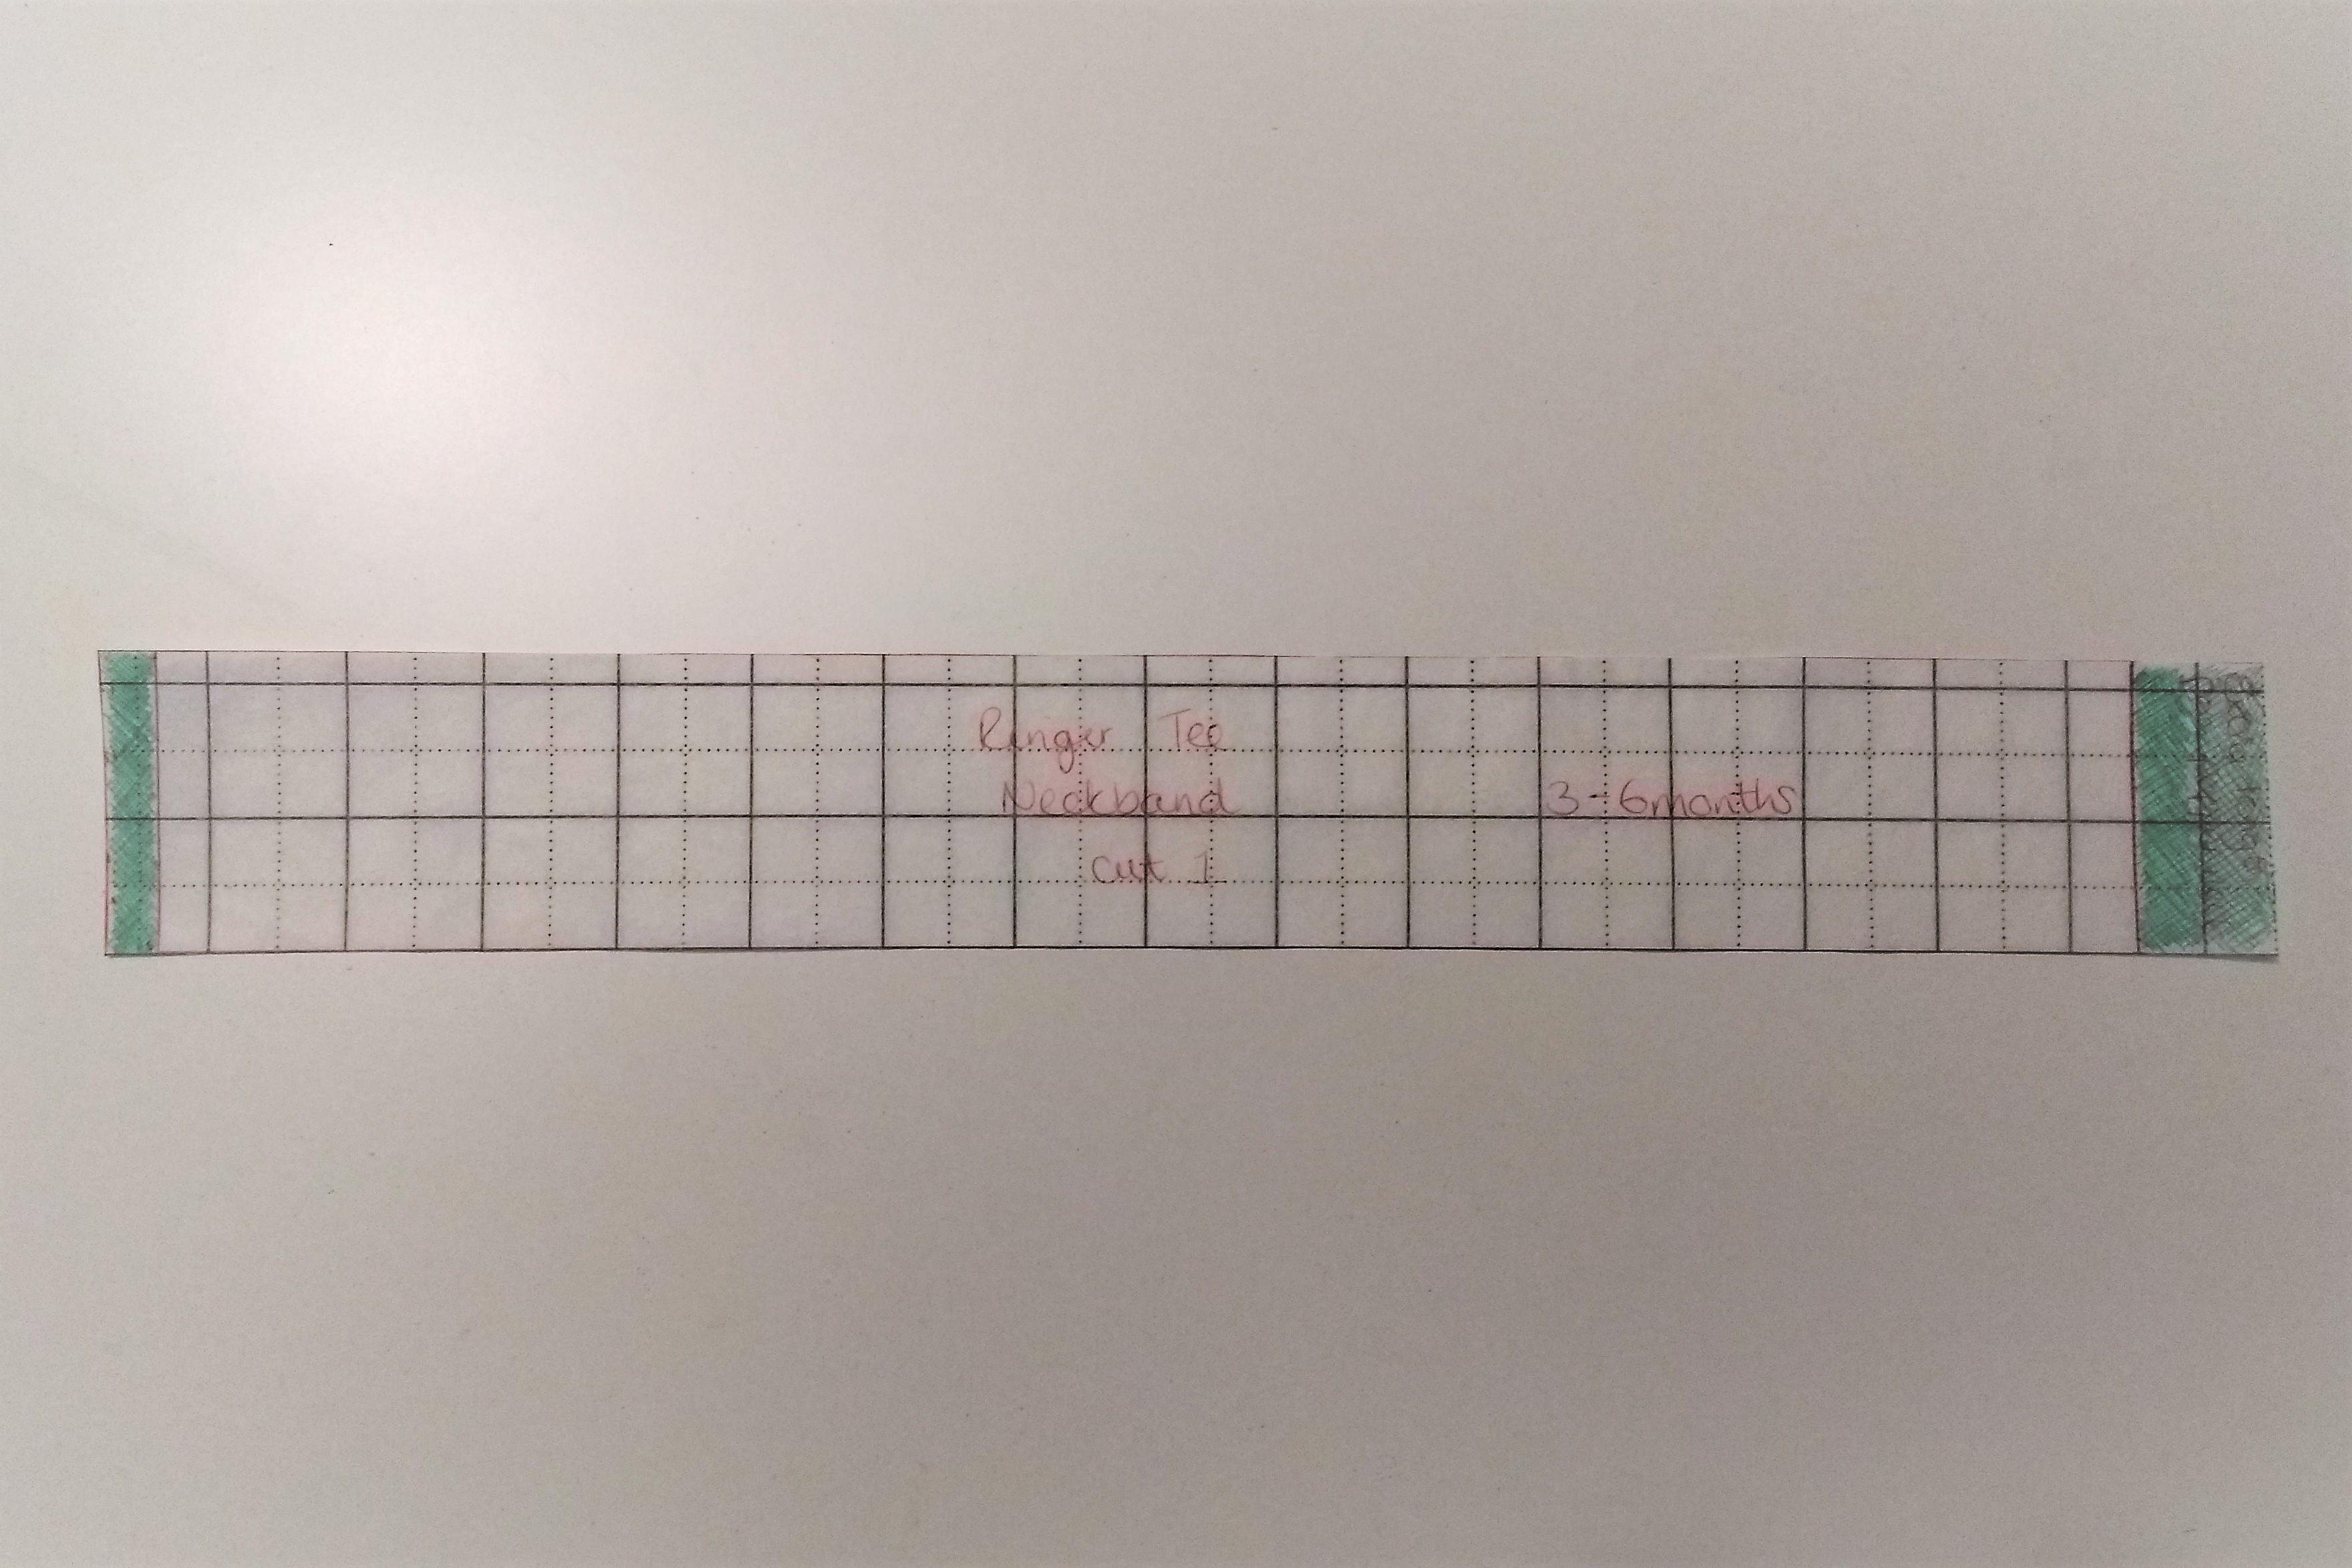
The pieces that we are altering are the front, back, and the neckband. You will first need to trace off new copies of these pieces in the relevant size. Leave space around the pieces for the modifications.
The Ringer Tee has the front and back pattern pieces cut on the fold. We are going to make the pattern asymmetrical, so you may find it easier to trace the pattern piece off complete so that it can be cut on a single layer.
Step 2:
Decide how much of an overlap you want at the closure. I chose 1/2″ or 13mm.
I also decided that because it is a jersey pattern, and jersey does not fray I was happy to leave the inside edge raw or overlocked, rather than concealing the cut edge.
Step 3: Front Pattern Piece
You need to know what seam allowance the pattern you are working with uses. The Ringer tee has 6mm seam allowances.
Draw the seam allowance on to one shoulder seam. (the blue line in the picture)
Draw on another line which is 13mm (or whatever overlap you decided on) from the seam line. With my 6mm seam allowance this makes 7mm extra length in the shoulder. This extra area is shaded in green.
Step 4: Back Pattern Piece
Draw the seam line onto the same shoulder as you did for the front. (It will look like the opposite shoulder because the pattern piece is effectively back-to-front.) See the blue line below.
Draw another line twice the overlap away from your seam line. If you are using a 13mm overlap, this new line needs to be 26mm from the seam line. The extra area is shaded in green again.
Step 5: Neckband
Your neckband needs to have the total additional length added to it. This means the length added beyond the seam line. In my example that is 27mm. (13+26-6-6=27mm)
Sewing up
Step 6: Cutting out and first shoulder seam
Cut out the pattern pieces. Cut a tiny notch at the seam allowance line on the front and back shoulder on the side which was modified. Sew the other shoulder seam (the one without the pattern alterations) as in the pattern instructions. Press the seam to the back.
Step 7: Neckband
Fold and press the neckband in half. Stitch it to the neckline. Press the seam down towards the body of the top. It should now look like this, with the neckline finished, and one shoulder open.
Step 8: Prepping second shoulder
Finish the shoulder seam allowances if you wish. Press over 13mm on the front and back shoulder seams. Use a strip of fusible hemming web to keep the fold in place while you complete the rest of the construction.
Step 9: Prepping the overlap
Overlap the back shoulder over the front, using the shoulder seam notches to align properly. Use pins to keep the overlap in place.
Step 10: Sleeves
Insert the first sleeve, matching the shoulder notches to the central notch of the sleeve. Once it is sewn, this will keep the overlap in place.
Insert the other sleeve.
Step 11: underarm and Side seams
Sew the underarm sleeve, and side seams together in one continuous seam.
Step 12: Cuffs and Waistband
Sew the short edges of the sleeve cuffs and waistband. Press them in half wrong sides together.
Sew the waistband and sleeve cuffs to the body.
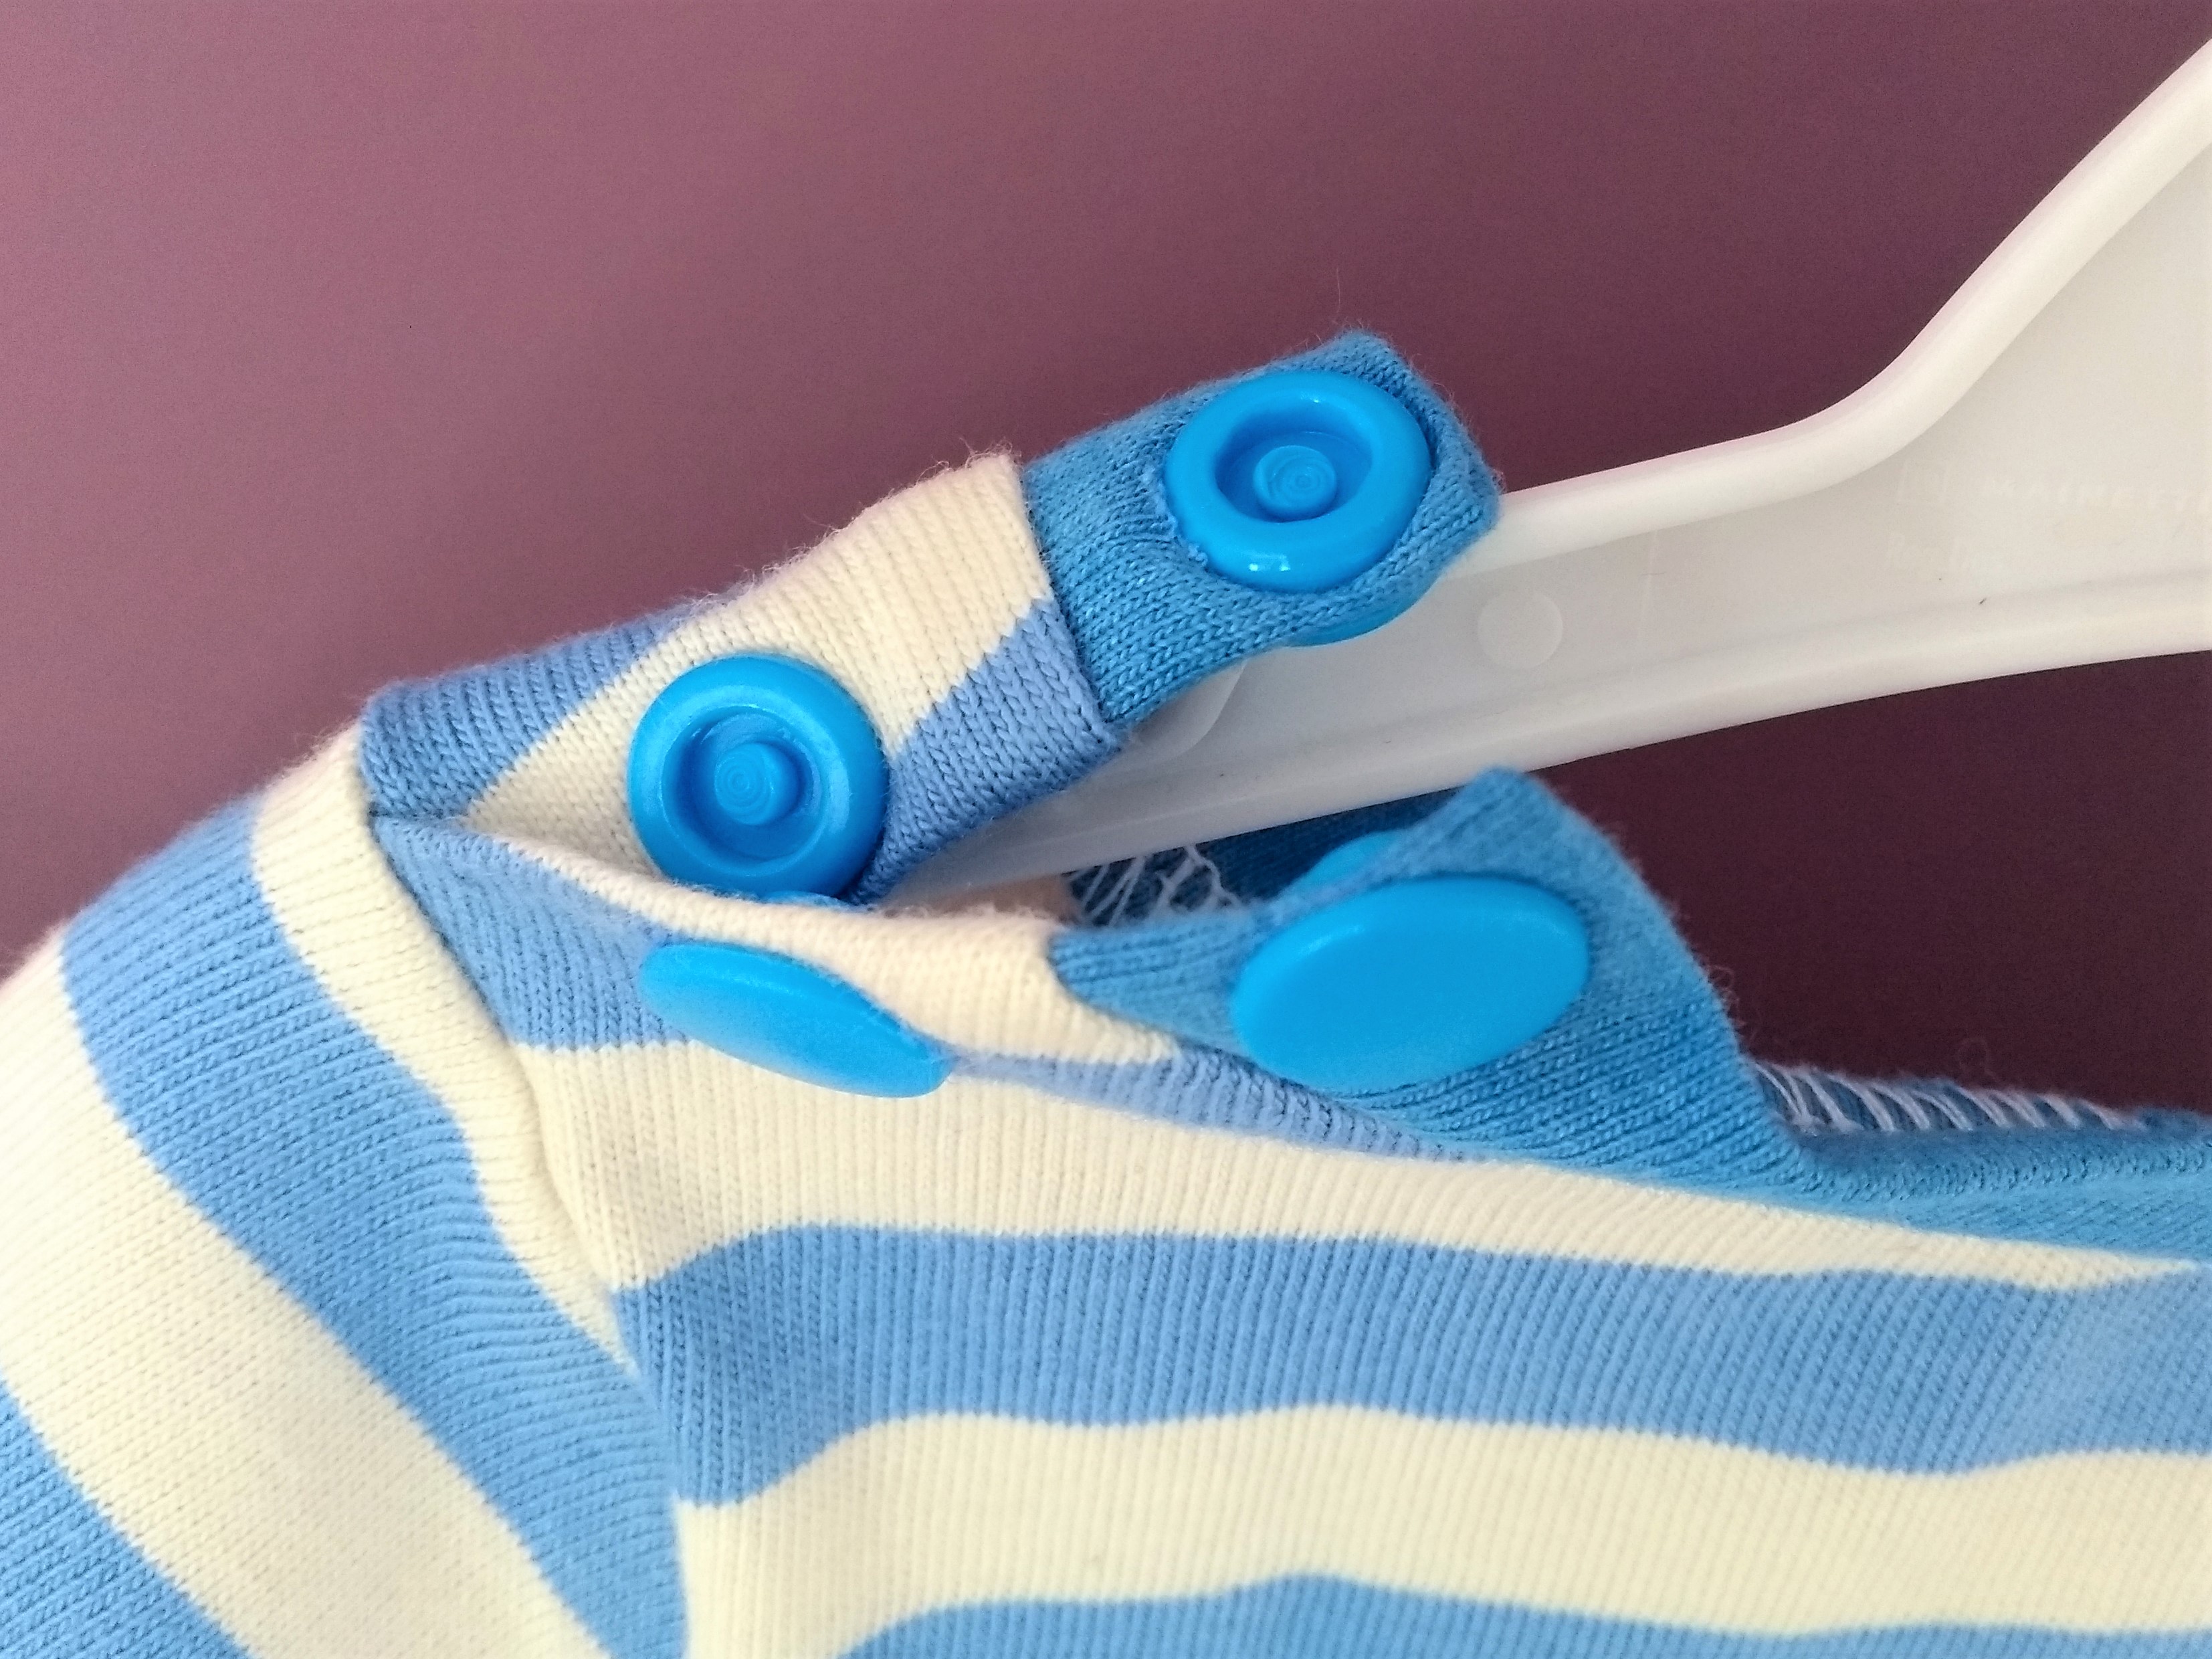
Step 13: Attach snaps to open shoulder
Attach snaps to the open shoulder seam, aligning the two halves. I used two snaps on this 3-6 month size, but on larger sizes it might be better to use more.
You may wish to use jersey snaps like these which have multiple prongs because they are less likely to pull out with time and wear. I generally use Prym vario pliers to apply snaps. Much easier than all the hammering!
A little while ago I shared a couple of Brindle and Twig patterns that I had been making up multiples of- the cuff leggings and raglan tee. This time I’ve been using a free release from Brindle and Twig- the ringer tee, but I had a few thoughts on making it more practical for dressing wiggly babies!
The basic ringer tee is already a great pattern. Some pattern companies release free patterns so that you can get to look at their instructions and drafting and decide if you like them enough to work with in their paid patterns. This is a well drafted basic tee in lots of sizes (it goes from 0-3m to 6 years) so another pattern that I should get lots of use out of. With that in mind, I had the pattern printed in colour to make it easier to see the different sizing lines, and just traced off the size that I needed.
I went with the 0-3m size again, but one of my concerns before with the raglan tee’s was whether the neckbands would be easy to get over baby’s head. I’ve heard that babies sometimes don’t like things being put on over their head and I wondered if I could hack the pattern to make it easier. I have seen quite a few baby t-shirts and jumpers with snaps at the shoulder to make the neckline bigger while putting them on and off and it looked like a simple fix.
This hack was actually really easy to do. I just extended the neckband, and the front and back shoulder on one side so that I had a bit extra for folding over. It makes putting the neckband in particularly easy because you only sew up one shoulder seam, then put the neckband in flat. Press the excess over on the open shoulder, and pin together at the right position while the sleeve is inserted, then just add snaps. If people are interested I can put together a proper photo tutorial of how to modify the pattern pieces and sewing process.
I used my vario pliers and some prym colour snaps to co-ordinate with the jersey. I’m not sure how robust these will be as I don’t know if I interfaced the snap section enough to stop the jersey from stretching out and releasing the snaps. I think on the next version I will use jersey snaps instead which should be more robust. I’m pleased with this as a test run though. It looks super cute, and extra practicality. Now I just need the baby to arrive to test it out!
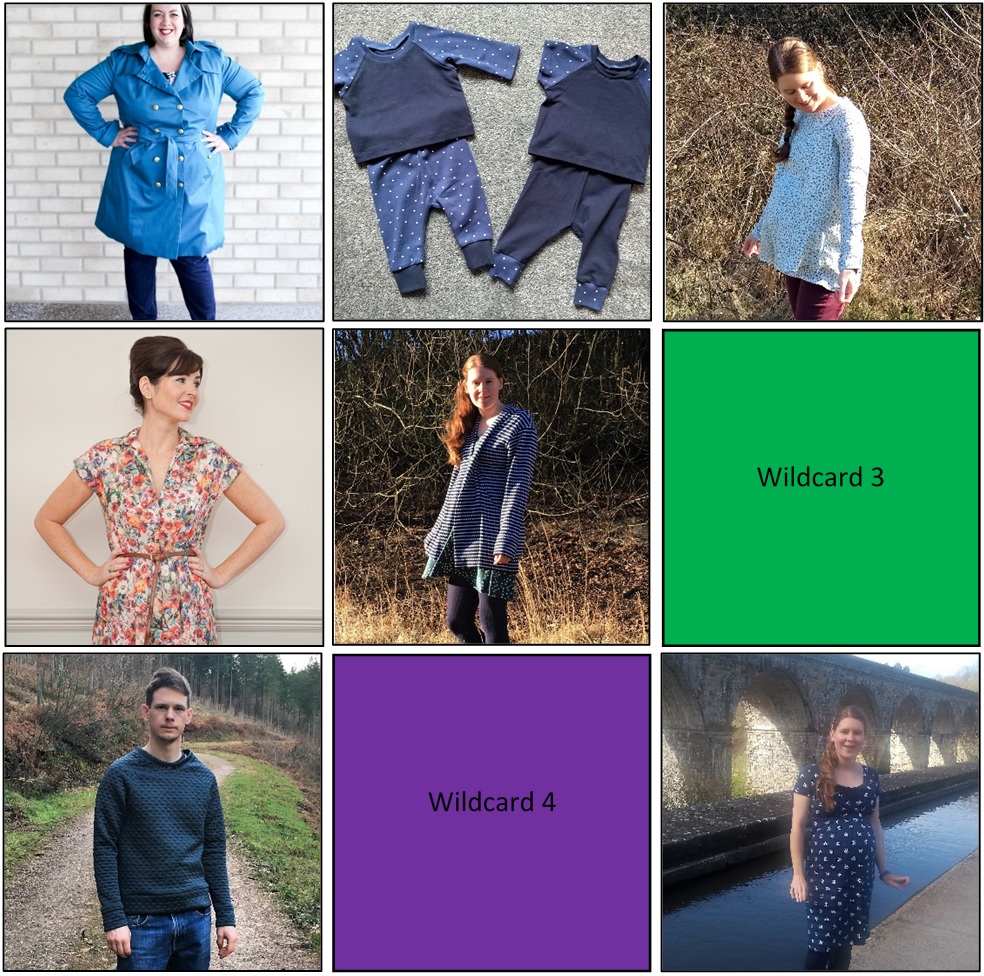
I figured that we are a good chunk through the year now, and it would be a useful exercise to see how I was getting on with my resolutions for the year, while I still have time to get back on track if it was all going awry. Amazingly, sewing-wise it seems to be going pretty well so far and I’m feeling fairly on track to achieve the things I was hoping to, despite feeling like a whale at the moment and waiting for baby to arrive! This is what my make nine plans looked like at the start of the year:
Since then I have decided on, a couple of my wildcard patterns, and have also made up quite a few of these patterns too, some of them several times.
Another of my plans was to be less impulsive with buying new fabric and patterns, and to use more of what is already in my stash. So far it has been a roaring success! I’ve not bought any new fabric so far this year except for my Trench Coat project, despite being very tempted at a couple of moments by various sales! It means that all the projects that I have been working on so far this year have come from stash fabrics, some of which I had forgotten even existed. I will need to buy some fabric soon for the Penny dress because I don’t have anything suitable stashed away, but I think I’ve done amazingly well to come so far without a single impulse fabric purchase.
Pattern-wise, my only purchases have been the Penny Dress, the Brindle and Twig Patterns, and I did get Tilly and the Button’s new book Stretch when I recently subscribed to Love Sewing again. Again, pretty restrained so far! Turns out I have quite a few patterns in my stash which can be hacked or modified to make some lovely and enjoyable sewing.
So in terms of what I still have to do this year, it seems to be going ok! 5 of 9 of my make nine completed, one in progress, and another at the planning stage. Still two choices to make, but I’m starting to narrow down what they will be. Fabric and pattern buying under control, and I’m thinking I should do some more sorting out of my stash to give away some of the things which will never see the light of day otherwise. There are definitely some pieces which just don’t inspire me anymore, but might be just the thing for someone else. I would like to narrow down my stash so that it contains just fabric that I can’t wait to sew.
Early in the year I was inspired by Tilly from Tilly and the buttons and the cute little outfits that she had made for her new baby boy. It inspired me enough to buy the Raglan Tee and Cuff Leggings from Brindle and Twig, so that I could have a go at making something for my bump to wear when they arrived too! Given my self imposed pattern buying limit of 4 for the year, it did seem very selfless to be using it for someone other than myself (though I did decide that these patterns were so small that they counted as one outfit, instead of two separate patterns), and this is another of my make nine successfully completed.
One of the things that drew me to these two patterns was that they both have amazing sizing scales. Both go from newborn up to 6 years, so these are patterns that I will be able to use for years to come. With that in mind, I had them printed in colour to make seeing all the different size lines easier, and then traced off the size 0-3m separately. I generally use pattern paper from Amazon (like this), but I was pretty much out, so these got squeezed onto whatever I had lying around.
It was really fun rummaging through my knit fabric scraps for different colour and pattern combinations, and seeing what I could squeeze out of various pieces of fabric. The short sleeve piece, and the legging cuff are both great for little scraps too small to do anything else productive with. I’ve used a few Girl Charlee cotton spandex plains to co-ordinate, though some of those pieces were scraps too.
I still don’t know if we are expecting a boy or a girl, so I wanted to keep most things pretty gender neutral, and I really liked the idea of clothing that is able to mix and match so that when some of the outfit inevitably needs changing, I can just stick on any of the other pieces and it won’t look odd.
I figured that by sticking to a fairly simple colour palate for each size range that I sew up then I should be ok there, so in the 0-3m I’m going for navy, blue and white. I was inspired by Skirtfixation and the amazing co-ordinated child capsule wardrobes that she has put together using scraps too.
That said, I did have a couple of more girly fabric pieces which were just big enough for these patterns, so I thought I would run with it anyway. I have a couple of friends that are expecting in the next couple of months too, so perhaps this set will make a good gift when one of their little ones arrives.
Sewing-wise, these patterns are brilliantly simple, especially when they can be whizzed together on the overlocker. Some parts, like putting the cuffs on the leggings are a little fiddly, but that is only because they are so tiny!
I do like playing with mixing and matching all the different combinations. They look very cute!
My only slight concern is that the neckband might be a little bit tight or small, but if that does prove to be a problem then I can just cut the current one off and install a slightly longer one.
I haven’t been able to test any of these out yet for practicality in the real world, with an actual wiggling baby, but they are super cute so I’m hoping that they will get lots of use one little one arrives.


![Parkland_Menswear_Pattern_Collection-19_7608de3c-c2ec-4936-a453-9dded55e6c4d_1024x[1]](https://naomisews.files.wordpress.com/2018/04/parkland_menswear_pattern_collection-19_7608de3c-c2ec-4936-a453-9dded55e6c4d_1024x1.jpg)
![il_fullxfull.1358296121_q7j6[1]](https://naomisews.files.wordpress.com/2018/01/il_fullxfull-1358296121_q7j61.jpg?w=306&resize=306%2C306#038;h=306&crop=1 "il_fullxfull.1358296121_q7j6[1]")
![Red_67ca570c-9f99-4f40-9ef9-197056d7d882_large[1]](https://naomisews.files.wordpress.com/2018/01/red_67ca570c-9f99-4f40-9ef9-197056d7d882_large1.jpg?w=306&resize=306%2C306#038;h=306&crop=1 "Red_67ca570c-9f99-4f40-9ef9-197056d7d882_large[1]")
![71dMxHXi9IL[1]](https://naomisews.files.wordpress.com/2018/04/71dmxhxi9il1.jpg)