More nursing layers

I am enjoying my previous Agnes and Amber pattern mash-up, but I wanted to try another method of getting breastfeeding access with a t-shirt. My previous hack works great, but variety is always nice, and I fancied a long sleeve tee with a neckband because my upper chest/neck keeps getting cold!

IMG_20181027_133104954_BURST000_COVER_TOP

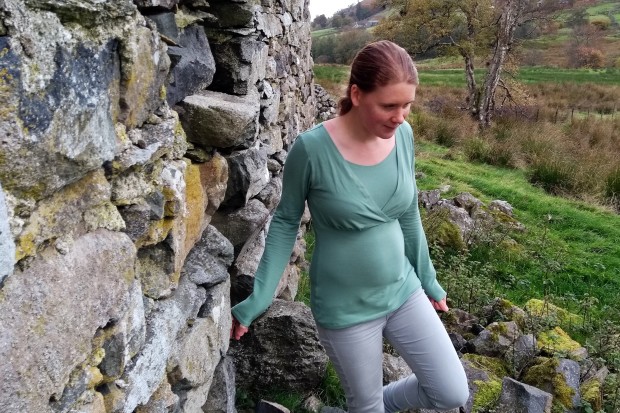
This is based on the Tilly and the Buttons Agnes Top and is a much simpler pattern hack than the previous one because it involves modifying fewer pieces. I would detail the changes, but Zoe from SoZo what do you know already has a great tutorial and I didn’t really do anything different.  I think the overlap would be less obvious if I had found a better thread colour match for the topstitching, but I found this fabric difficult to match and it will probably be hidden under my layers anyway.

IMG_20181027_143427728_HDR

This option is quicker to construct and does give a sleeker silhouette for layering, though I think my other hack is easier to use. I will definitely be using both options, and will probably make some more too. I have some lovely peacock blue cotton spandex which would look great.

IMG_20181027_143437515_HDR

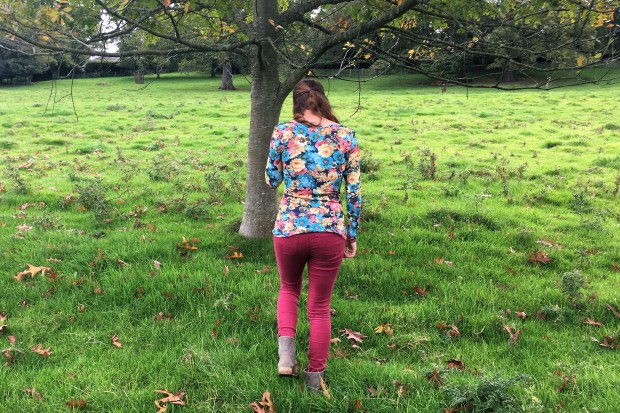
One of the best things about this top is the way it has helped me to reconsider and start wearing a few clothes that had been slightly forgotten. Here it is layered under my Bridgetown Backless Dress as a tunic, and worn with the crossover at the front.

IMG_20181027_143359740_HDR

Slightly different styling from wearing it to the wedding I made it for.

IMG_1428

I also made Matt another Metro tee to match! It doesn’t really deserve its own post as I’m pretty sure I’ve already said all there is to say about making up that pattern. It’s probably one of the best value patterns I own though for the number of times that it has been used (closely followed by the Agnes and Amber patterns too!)

IMG_20181117_105641926

Breastfeeding Friendly Layering

In the autumn and winter, I usually layer up long sleeved t-shirts, shirts and cardigans, but this year my clothing needs to be feeding friendly.  Currently none of my long sleeved t-shirts really facilitate that, so I’ve needed to come up with a pattern hack solution.  This top is my first attempt at creating a slim fitting layering t-shirt which I can feed in.

IMG_20181018_142043483_HDR

I’ve hacked together the Megan Nielson Amber, with my usual layering top- the Tilly and the Buttons Agnes.  Both of these are tried and true patterns for me, with multiple iterations (For Amber see here and here, Agnes here and here).  I’m using the front bodice piece of the Amber, and the modesty panel, but I’ve raised the centre front on this panel about 5cm to keep me warmer.  Then I’ve attached it to part of the front bodice of the Agnes.

IMG_20181018_142053229

For the back, I’ve mostly used the Agnes bodice, but tweaked the armscye to fit the Amber sleeve.   The sleeve has been slimmed down a bit too to make it fit under layers more easily.  This is how I’m most likely to we wearing it on an everyday basis- worn with jeans and an Archer Shirt.

IMG_20181018_141956802_HDR

I’m pretty pleased with this as a first try.  I do have another hack in mind to try so hopefully I will be able to show you that one too soon.  Like Matt’s recent Metro tee, this is made with the Girl Charlee solid cotton spandex in Sage Green.

IMG_20181018_142113118_HDR

I’ll be wearing this all winter I’m sure.  I’m really glad to be able to keep warm and cosy in my layers again!

IMG_20181018_142007559_HDR

Maternity Agnes Tops

I am a massive fan of the Tilly and the Buttons Agnes top (see some of my versions here and here)- it really is one of my wardrobe staples, so the recent release of a maternity version seemed perfect!  I still get to have all my lovely layering and basic tees, but with some extra space for a growing bump.

IMG_1788

There are a couple of variations included in the pattern, including a dress which I may make at some point soon.  To start with though I thought I would give the top versions a go.  They are a bit longer than the standard Agnes tee, and the sizing chart is different, so do double check which size to cut.  I am a size 3 in the regular Agnes, but a size 2 in this maternity version.  Some of the extra length is gathered at the side seams to create the fullness required for a bump.

IMG_1741

I made two versions, both with fabrics which have been waiting in my stash far too long for the right project to come around.  First up, I made a 3/4 sleeve top with side ties from a lovely Girl Charlee cotton jersey called Coral Peach Floral.  It doesn’t have the hugest amount of stretch, so I should perhaps have enlarged the sleeve width a little, but other than that I really like it.

IMG_1796

The little side ties are a slightly labour and time intensive addition because they are a nightmare to turn through, but there is definitely some extra belly room, and more than I need at the moment at 4 months so still room to grow.

IMG_1819

Next up, I used a cotton interlock from ebay in a wine colour.  For this one, I just wanted a really basic layering tee, so I left off the side ties and went for full length sleeves.  This one was super quick to put together, and I can see I am going to want more of these.  The interlock jersey is lovely too. A good amount of stretch, and super soft and snuggly.

IMG_20171229_224257701_BURST000_COVER_TOP

I think this pattern is going to be a staple in the next couple of months.  it is so quick to put together if you leave the ties off, and with the dress variation to try out as well, I think i’m going to have another TNT pattern to replace the regular Agnes.

IMG_20171229_224338204_BURST000_COVER_TOP

Winter is Coming- Time for Agnes!

I love a good remnant!  Even with less than a metre there is usually enough for a top, like in this viscose blend jersey remnant from Fabric Godmother.  I scored 80cm for 2.99 and it was perfect for cutting out a Tilly and the Buttons Agnes Top with just a couple of scraps left over.

IMG_0696

These are not my first Agnes tops, and I am still wearing the ones that I made up last winter.  This is just the basic long sleeved Agnes pattern with no adaptations.  The fabric does all the work.  It doesn’t need anything fancy, but I do think this is a very cute autumn look.

IMG_0726.JPG

The same is true of this oversized t-shirt that I found in the charity shop for £1.  I did have to cut pretty creatively for this one, and even then couldn’t quite get full length sleeves, but I love the sparkle!  I even had to cut the neckband in two pieces which is why there is a join at the centre front, but I decided to use the ruched neckline to try and make it look deliberate.

WIN_20171014_09_44_01_Pro

Tops like this are staples in my winter wardrobe and are so quick to make up.  Less than 2 hours from cutting to wearing makes these a real bargain, and very satisfying make.  Especially with an overlocker to finish and sew the seams at the same time- I do love my Janome 6234XL.

WIN_20171014_09_44_32_Pro

There will surely be more of these in the months and years to come.

IMG_0716

IMG_0746

Lane Raglan

Coming into spring, I am definitely feeling the need for candy colours and for some more t-shirts.  I am experimenting with a lot of new patterns at the moment. This one, the Lane Raglan by Hey June was popping up all over the place and it looked so pretty that I couldn’t resist!  I already have a couple of t-shirt patterns (see my Tilly and the Buttons Agnes here and Sew Over It Molly Top here) but I don’t want to be wearing the same one all the time, and while I can make some changes to these patterns, the Lane Raglan is different enough that I wanted to give it a try.

IMG_2135.JPG


The three patterns listed above all have different ways of dealing with the sleeve.  In the Agnes Top, there is a set in sleeve which I have found fits me particularly well.  The Molly Top has a cut on Kimono style sleeve, but I haven’t had much luck with the longer sleeved version. Lane is a raglan sleeve and this simple shape makes it perfect for colour blocking.  It also means that the body and sleeves are perfect for smaller fabric remnants.

IMG_2234.JPG

Having made quite a few t-shirts now, I didn’t really have any trouble with cutting or sewing this up.  I was a little surprised though that there were no notches in the pattern at all to help get everything lined up.  It didn’t cause me any issues, but might be worth bearing in mind if this is the first time you have made something like this.

IMG_2111.JPG

Hey June patterns are pretty cool because they have different pieces included with a full bust adjustment (FBA). My measurements put me slightly above the size XS (with the FBA) but the advice in the pattern is to size down if you are between sizes.  It has turned out fairly roomy and I certainly wouldn’t have wanted to size up. I’m not totally sure about the fit around the arm, but I’m not sure if that is just how the raglan sleeve fits or if there is something I can do to improve it.

IMG_2220.JPG

I made this top with fabrics from Girl Charlee and they are just perfect t-shirt weight.  Both are cotton spandex blends so they should have good recovery and are a plain coral and a beautiful floral for contrast.  Both fabrics have sewn up well, but I have noticed that the white backing does sometimes show through the print on the floral if it gets stretched sewing.  This top does not have the neatest insides because for some reason my overlocker did not seem to like the plain coral fabric! It kept ending up with little ripples and tucks, thought they aren’t really visible on the outside.

IMG_2176.JPG

I’m pretty happy with how this has turned out and it is a nice change from my other t-shirt patterns.  There are several variations in this pattern including a hem band and a hood to make it into a sweater/hoodie and I’m keen to give that a try at some point.  I have a selection of other Girl Charlee prints waiting to become t-shirts so I think there will be a few more raglans in my wardrobe soon!


My second Moneta

Having had a chance to test out the Moneta pattern by Colette a couple of months ago when writing my guest post for Minerva crafts, and having seen some awesome variations in Instagram as part of the Moneta Party, I thought that I would have another go.  This time I made a few little changes, including shortening the sleeves for spring!

IMG_1188

Once again, pockets seem to be an essential feature of everything that I make!

IMG_1158.JPG

They are just so perfect for sticking your hands in on a spring evening.

IMG_1164

My previous Moneta dress fit pretty well, but I have taken in a little at the waist, and this time I have adapted my altered pattern pieces from before so that all the seam allowances are the same now.  Once again, I used the Tilly and the Buttons Agnes top to modify the bodice pattern so that it fit me better.

IMG_1205

The only other real change was to switch the gathers on the skirt for pleats.  To do this I measured the difference between the bodice measurement and the top of the skirt. I divided this by 4 (for the 4 pleats- two at the front and two at the back), and then divided by two again (to work out how much fabric I needed to take in at each side of each pleat).  This sounds very complicated when writing it down, but in reality is very simple.  I did add clear elastic to the waist seam, even though I wasn’t gathering onto elastic, to avoid the seam from stretching out in the future.


IMG_1155 (2)

Surprisingly difficult to see the pleats in this fabric, but I do like the flat front that it gives to the waist.


This fabric came from Ebay and can be found here still.  It is a printed Ponte Roma and like my previous Moneta is a nice weight, but still drapes well in the skirt.  I love the deep hems on the skirt and sleeves.


IMG_1203

Perfect drape for a bit of swishy-ness


I’m sure there well be more of these dresses in my wardrobe at some point.  It is just so versatile- can be dressed up or down, can be worn layered or on it’s own.  It is a great pattern for adding options to your wardrobe.

IMG_1211


Agnes Top

I wear so many long-sleeved or 3/4 sleeved tops under jumpers and dresses in the winter, so this Agnes Top by  Tilly and the Buttons has become a staple for me.  I have 2 different versions, using all the pattern variations, which include elastic and gathering options for the sleeve and neckline.

I love that this pattern is well fitted to my shape.  I have cut a size 3 in two different fabrics, but both have worked well.  One is in the same teal stripe from Girl Charlee as my Molly Top from a couple of weeks ago, another is in a cheap polyester jersey from Trago.  The trago fabric was lovely and simple to work with because there was no need for stripe matching, but I did find that if overstretched the white backing shows through which is a shame.

img_0875-3

With basics there is not really a huge amount to say.  This pattern has fantastically simple instructions and illustrations.  Tilly really does have a way with creating beginner friendly patterns.  If working with jersey fabrics is intimidating to you, she offers an online workshop for this pattern too. I haven’t used it myself, but if it is like her written explanations, I’m sure that it is a great way of learning to use these sometimes scary fabrics!

As I said the fit is great, and if you have already seen my guest post for Minerva Crafts you will know that I used this pattern to modify the fit of the Colette Moneta dress too.  I’m sure I will be using this and other Tilly and the Buttons patterns again in the future.

img_0834-2